Dave wrote on 05/15/13 at 04:56:47:.....so tighten them in a criss cross pattern...
A while back, I offered up this tightening pattern as a straw man. So far, nobody's sh*t on it.....
When installing the cylinder head cover, the FSM says to tighten the cylinder head bolts "diagonally." Clymers says the same thing, but adds to tighten the bolts in the middle of the cylinder head cover first.
With this vague guidance in mind, here is the bolt tightening order I've arrived at after removing and installing the cylinder head cover a few times (loosening order (e.g. when removing the cylinder head) will be the reverse of the tightening order):
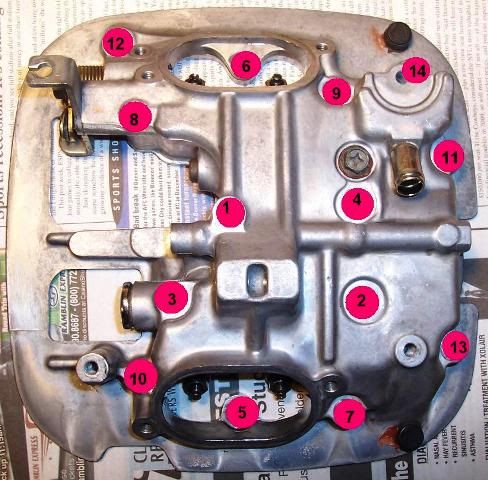
My methodology was to start with the inner-most bolts and move diagonally as much as possible. This is just the pattern I have been using. Your way most likely will be better, please share if so.
I torque these bolts using a 0-200 in-lb beam torque wrench in three stages (snug, half-torque, full-torque).
Note that the bolt associated with position #12 in the above picture represents a special challenge. This is because said bolt is also used to secure the port decorative chrome head cover. However, with that cover in place, some of the other head cover bolts would be hard to access.
However, if you don't mind going through a little extra trouble, you can still torque the head cover in a complete fashion - to include bolt #12.
Here is what I used to take the place of the decorative head cover - a stack of washers:

I just place a bunch of washers on the bolt. This allows me to torque the bolt down properly.
After the gasket sealant used on the head cover is cured, I remove the washers and install the left decorative chrome head cover, taking care to re-torque the subject bolt properly.
IHTH someone!

 Pages: 1

